Easter Bunny Head Shaped Box

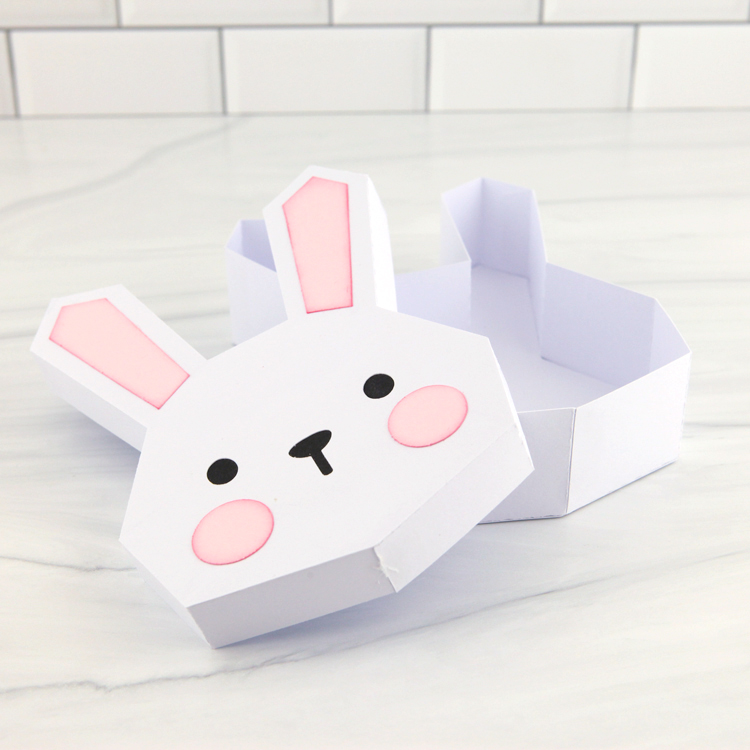
I’m hopping into Easter with this adorable new Easter Bunny Head Shaped Box (SVG, Silhouette) !  It’s so cute, and easy to assemble… it’s perfect to hold some sweet treats for your favorite bunnies!!  Take a peek…

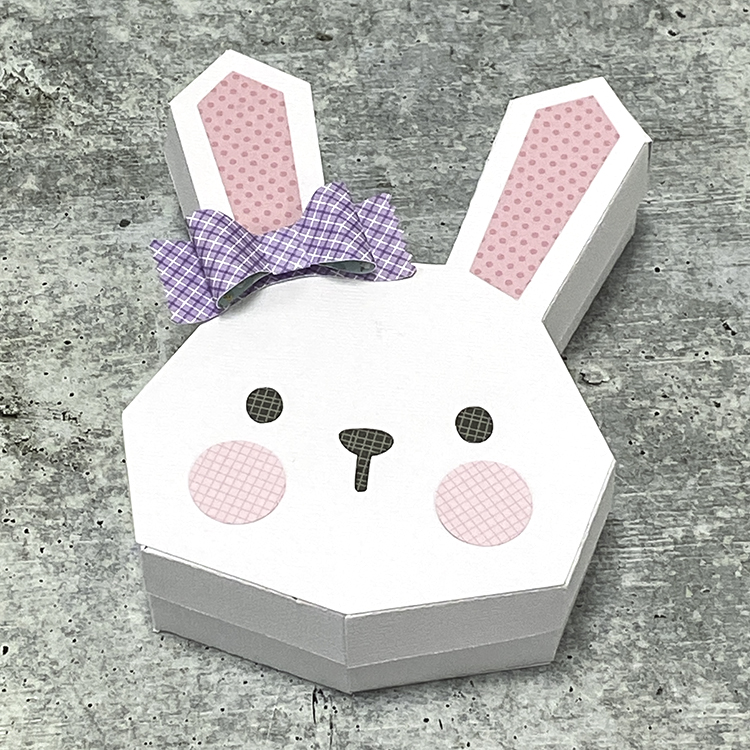
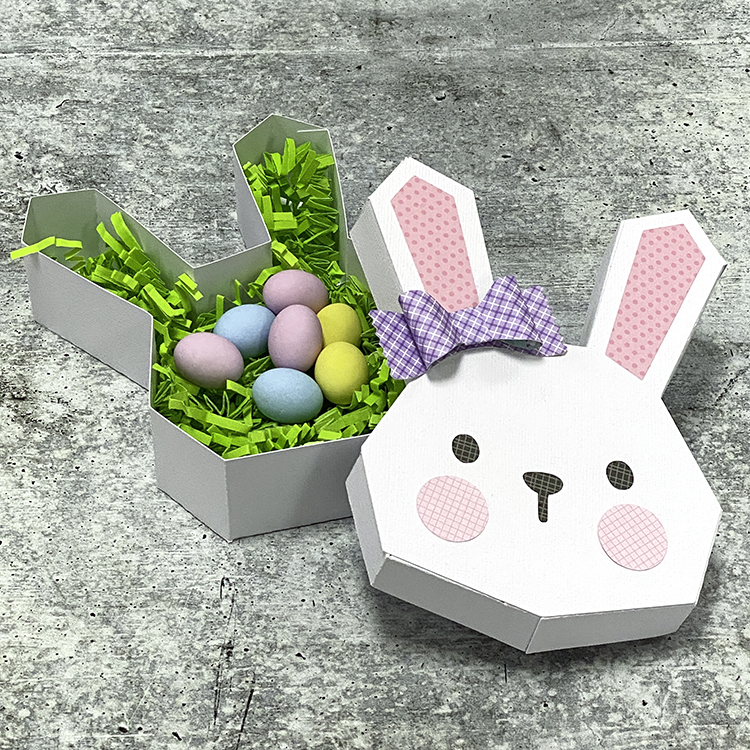
I decided to add a little bow to my bunny using this 3D Bow (SVG, Silhouette) which I sized down slightly to fit the ear.  Below, is a quick guide to assembling this box.

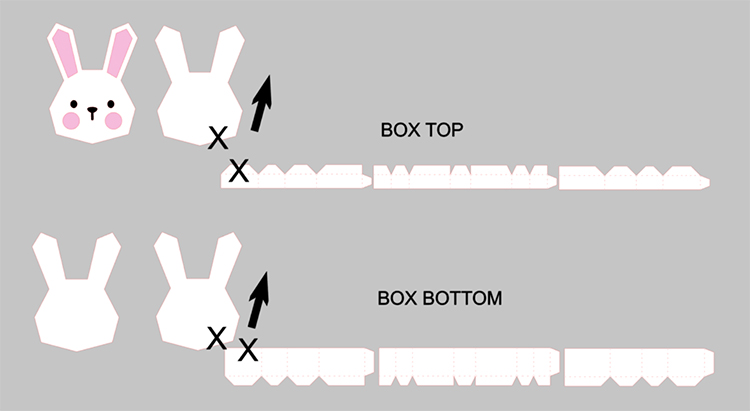
When you open the file, the sides of the box top and box bottom are shown in the order they are attached.  Simply glue them together to form one long strip.  Both the top and bottom are assembled in the same manner. They each have 2 bunny head shapes.  One is slightly smaller.   For the top, starting where indicated (X), wrap the sides of the box around the smaller bunny head, gluing the tabs as you go. (tabs go on the outside of the bunny head shape)  Flip the completed piece over, and add the second, slightly larger bunny (be sure to add the black behind the eyes and nose first)  head to the cover, covering the tabs.  Repeat the same process with the bottom.

If you create any of these cute boxes, be sure to tag @loriwhitlock on Facebook and Instagram!  That’s it for me today, thanks for stopping by to peek.

BLOG | INSTAGRAM

Friday $5 SVG Bundle Ends at Midnight!

This awesome Friday $5 Bundle is available until midnight and when it’s gone it’s gone.  These SVG files can be used with Cricut Explore, Silhouette Studio (with the Designer Edition upgrade), Scan N Cut, and any other cutter that will work with SVG files. Help spread the word by telling your friends and announcing it on social media!

Be sure to pick up this Easter Shadow Box Card Bundle including 5 SVG files for just $5**!

The cost of this bundle is $5, for $12.45 worth of SVG files, over a 59% savings! But don’t wait, this bundle will only be around until TODAY at midnight!

** Because Friday $5 Bundles are already heavily discounted they are not eligible for further discounts including monthly, seasonal and flash sales.

Have a great day!

New Spring/Easter Projects Bundle 2

Just in time for Easter, I have a fun new Spring Easter Project Bundle 2! There are 5 new projects… some cards and an adorable Bunny Box!  Take a peek…

Hexagon Pop Up Card Bunny Carrots   (SVG, Silhouette) – Tutorial

Slimline Easter Bunny Card  (SVG, Silhouette)

A2 Easter Chick Bunny Row Card  (SVG, Silhouette)

Slimline Vertical Easter Chick Card  (SVG, Silhouette)

Easter Bunny Head Shaped Box  (SVG, Silhouette)

There’s still time to get your Easter cards and projects done, so head over to the Lori Whitlock SVG Shop or my gallery in Silhouette today!

Have a great day!


April 2022 Kit of the Month

We have a brand new special for the entire month of April! You can get this Free Kit of the Month with any $20 purchase (Purchase must be in one transaction.) Simply add the 2022 April Kit of the Month to your shopping cart along with ANY $20.00+ purchase from the SVG Shop and this file is yours FREE. Be sure to use Coupon Code: APR22KOTM (case sensitive) at checkout. This offer is good through April 30, 2022.


(Your cart must reach at least $27.95 before the coupon will be applied and then $7.95 will be subtracted from your total at checkout. The files will be available for immediate download after you pay for your order by visiting MY ACCOUNT>COMPLETED ORDERS>ORDER DETAILS inside of your account. Only one discount code per order allowed.)

(These downloads include SVG files that may be used with Cricut Explore, Silhouette (Designer Edition upgrade required), Eclips, Brother Scan and Cut, and any other software that will open SVG files.)

Thanks for visiting the blog today! Please let us know if you need any help with your files. We want to make sure everyone is happy with their purchase. Have a great day!


Easter Rainbow Box Tutorial

Hello crafty friends! Aimee here with you and I want to share a tutorial today on the 3D Rainbow (Lori’s SVG, Silhouette). And if you know me, then you know I’m always looking at the SVGs and thinking of other holidays/occasions to create the files for. The 3D Rainbow box I have for you today is for Easter but the file was originally created for St. Patrick’s Day. I used the Lori Whitlock Spring Fling and Easter Wishes papers on this project and I think it turned out so very cute! The added flower stickers are from the Easter Stickers (Lori’s SVG, Silhouette).

To start this project, let’s get to cutting out the pieces in the file. While I had the project pulled up in my Silhouette design studio, I changed the colors to get an idea of how I wanted this project to look. I chose softer Easter colors.

Here are the pieces cut out. I used a sturdy piece of white cardstock for the main box piece. If taken care of while storing, these pieces will last over the years! I still decorate my house with Lori Whitlock projects from a few years ago.

Next step is to add the rainbow pieces. I find it easier to adhere these pieces when the box is flat on my desk. To help with lining up the rainbow, I folded the box piece so I could see where the bottom line was. Finish adding all of the pieces and we are ready to move onto the next step.

Next I added the tabbed pieces on to make the rainbow into a box shape. I conditioned the pieces to curve (by running the pieces along the edge of my table) same as the box and then folded the tabbed pieces in.

I found it easiest to adhere the bottom tabs down to the cardstock first.

Tip: Start with adhering the front first because of it being the most viewed side!! I adhered the front first so that I could move the pieces around with my fingers and get it just right. Now add dots of glue to the back side tabs to close the box up.

A little tip I have on keeping the front and back up while the glue is drying is to use little pieces of washi tape. The pieces of washi will come right up without tearing the paper.

After the glue is completely dry (and washi gone) it’s time to have fun decorating your sweet little rainbow!

While working on this project, I was thinking this project would look absolutely adorable on my mantle with my Easter bunnies or on my tiered tray over in the kitchen!

Thanks for stopping by today!

Aimee