Box Card Tackle Box Tutorial

Hi Everyone!  Today I have an Anniversary version of Lori’s Father’s Day Box Card Tackle Box (SVG, Silhouette).  My husband is a big fisherman.  I thought it would be cute to swap out the Happy Father’s Day sentiment that comes with the card,  with a funny anniversary sentiment.  Our anniversary is still a bit away, but I’ll be all set with a card!  Take a peek…

This card looks complicated, but it’s really just a shaped box card.  I outlined below how to assemble it.  There are a lot of little pieces, so if you forget where one goes, remember, you can always reload the cut file into your cutting software, Lori groups the pieces together as they go in the final project.  I started by cutting all of my pieces.  The next few photos show the pieces, and where they go on the different inserts.

The base of the card has pieces glued to both sides.  This is the “outside” of the tackle box…

And here is the inside.. (my paper was green on one side and orange on the inside)

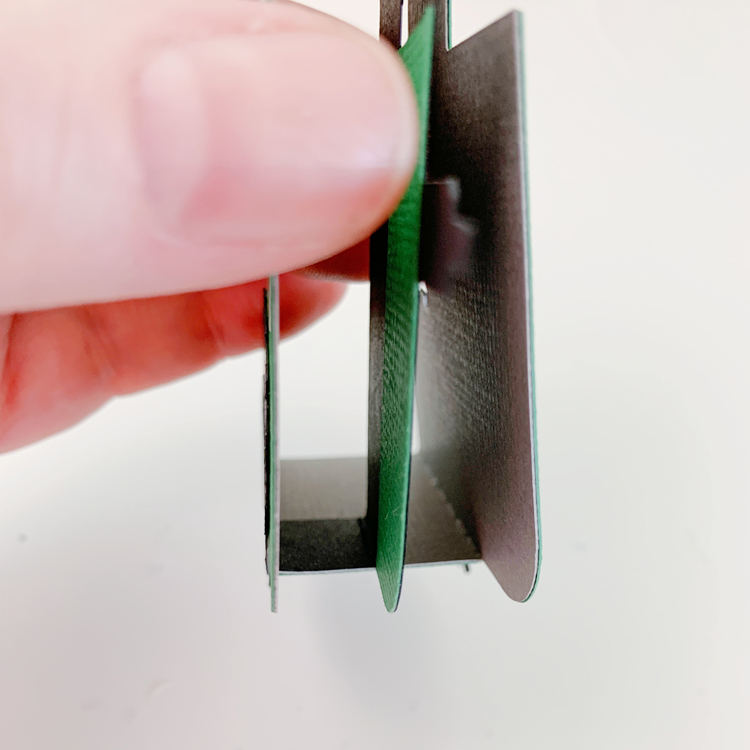
Once you have the card base and the inserts assembled, it’s time to assemble the whole card.  I started with the first insert (shown below)  This piece is attached right behind the front of the card.  I used some foam tape to give it a bit of dimension.

Once I had the first insert attached to the inside front, I added adhesive to the glue tabs on the card base and folded to form the “box.”

Next, I added the 2nd insert.  This insert is added just to the top “drawer”.  Add adhesive to the tabs, then position it about halfway in the top section of the base and press the tabs to secure.

All that is left is to decorate the outside of the card.  I added the gray strips to both sides of the box to look like the hinges.

And finally I added the bucket of fish to the front of the tackle box.  I used foam tape here as well.

Finally I added the sentiment I created.

Now I hope I remember to give him the card when our anniversary does come around!!  And don’t forget, this card along with all SVGs in the Lori Whitlock SVG Shop are on sale through Saturday!  Be sure to use code JUL2021 at checkout to get 30% off your order!


That’s it for me today, thanks for stopping by to peek!

BLOG | INSTAGRAM


Farmhouse Box Cards with Cathy

Hi everyone!  I’m sharing a couple Farmhouse Cards with you today…they are just so cute.  I couldn’t resist making these.  You can get the whole farmhouse bundle here in Lori’s SVG Shop.  I love them all, it was hard to choose which one’s to make.  You can find the Milk Jug Box Card SVG here and the Flour Canister Box Card SVG here.  You can also find the Milk Jug Box Card here in Silhouette and the Flour Canister Box Card here in Silhouette.  These go together quickly and fold flat to mail.  I just love the vintage style of Lori’s Designs for this bundle of cards and it worked perfectly with her new collection for  Echo Park Farmer’s Market.

Thank you for stopping by today and please share your creations with us!  ~Cathy

A New Friday $5 SVG Bundle!

Hi Everyone! Today we have a new Friday $5 Bundle! It will ONLY be available until Midnight Sunday and when it’s gone it’s gone. These SVG files can be used with Cricut Explore, Silhouette Studio (with the Designer Edition upgrade), Scan N Cut, and any other cutter that will work with SVG files. Help spread the word by telling your friends and announcing it on social media!

Now through Sunday, you can pick up this Gift Packaging Bundle including 5 SVG files for just $5**!


The cost of this bundle is $5, for $9.95 worth of SVG files, over a 49% savings! But don’t wait, this bundle will only be around until Sunday at midnight!

** Because Friday $5 Bundles are already heavily discounted they are not eligible for further discounts including monthly, seasonal and flash sales.

Have a great day!

Tractor Box Card Tutorial

Hi there friends! I have a quick tutorial for the Box Card Tractor (SVG, Silhouette). This box card is so cute and versatile.  Once everything is uploaded into Design Space be sure to attach the score lines on the card base and the middle insert. I cut all of the pieces out of various colored cardstock.  There is three pieces for each tire. I used a Xyron sticker maker for the four smaller rings. The white ring stacks on top of the tire first then the thinner back ring stacks on top of white ring.

The insert only has one colored piece to glue into place and the two tabs on the ends are valley folds.

For the body of the card there is two tractor body pieces, a small rectangle, and a small square. The rectangle in glued in the middle of the body pieces and square is glued on the end. Fold all of the score lines as mountain folds. While the card base is still laying flat the two larger tires are glued on the outside edges with the smaller tires glued in the middle. Add the glue to only half of the smaller tires. The other half of the tire will be off the edge of the card base once the card is assembled. Flip the card over and fold the left side over and apply glue to the tab then fold the right side over on top of the tab to close up the card. You should have a tractor box now.

For the middle insert add glue to the tabs then line up the front edge of the tab to the front of the box card. Hold to secure the glue and repeat on the other side of the card.

Fold the card flat to check that everything is lined up and that the card will fit into an envelope.

To embellish I added a floral sticker from the A Slice of Summer sticker book by Echo Park Paper Co.

Now this card is ready to be mailed off to someone special! That’s it for me today. Thanks for stopping by!
Brandie

You’re One Cool Dad Happy Birthday

Hello crafty friends! Today I have a very cool card card to share with you! This is the Cooler With Drinks (Lori’s SVG Shop, Silhouette) card that folds flat for easy mailing. It was part of the Father’s Day card set but Dad may just deserve a beer on his birthday too!

I love the sentiment on this one but wanted to make this a birthday card for my hubby. I highlighted and deleted the “Happy Father’s Day” part of it and left it blank. Then I made a print and cut of the sentiment along with a Happy Birthday banner from one of the Box Card Envelope files.

Then I adhered the happy birthday banner over the blank space of the cooler sentiment piece. It turned out amazing and he loved it! Always think outside the box to see how you can manipulate a file or add to a file to turn it into what you need.

Thanks for stopping by today!

Aimee