Black Friday Sale! Get 50% Off SVG Files!

This time of year makes us reflect on things we are thankful for and I cannot even begin to tell you how much I appreciate you all. I hope that you all had a wonderful Thanksgiving Day with friends and family, yesterday! Now it’s Black Friday and it’s time to celebrate with a sale in the Lori Whitlock SVG Shop!  Now through Tuesday, November 28th, Get 50% Off SVG Files, Fonts, Pattern Fills and Commercial Licenses when you use code BF2023 at checkout! Again, thank you all for being such loyal customers and for purchasing my SVG files. My family and I are forever grateful to you. Now, let’s get the holiday crafting party started…..

Check out these popular and fun files!! SHOP HERE

Christmas Project Bundle 2

Have a great day!

Gift Card Tag Santa Tutorial

Hello everyone, Marcia here.  Christmas is creeping up. I am a big fan of giving gift cards so my recipients can pick out their own gift but I like to make gift card holders to put them in. I selected the Gift Card Tag Santa (SVGSilhouette) to make for my gift cards this year.  There is a pocket on the back side of this tag that holds the gift card. I used Lori’s Have a Holly Jolly Christmas collection to create my tags.

These are really easy to assemble. Let me show you how.

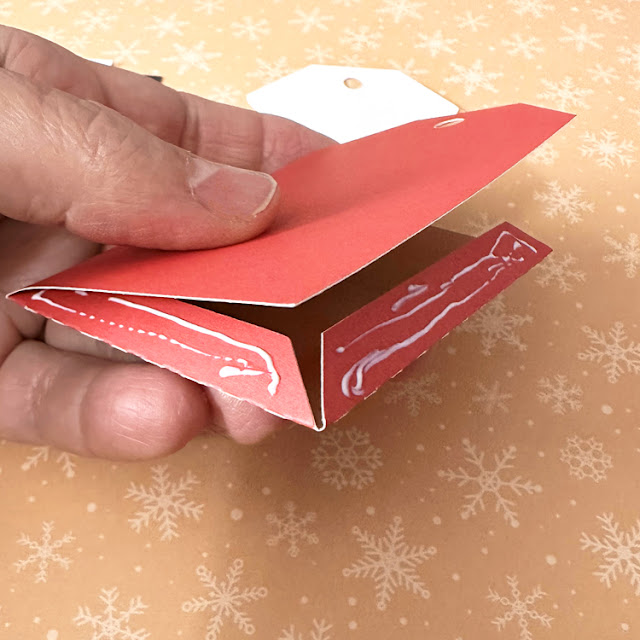
1. Cut out the pieces from the desired pattern paper or cardstock.

2. Fold the tag along the score lines folding the flaps up. Apply glue to the flaps and adhere to the back of the tag to form the pocket.

3. Adhere the white beard and Santa suit trim to the top of the tag.

4. Slip the black belt through the belt buckle and adhere to the bottom of the tag. Add the two black buttons above the belt on the white trim.

5. Add ribbon or other embellishments as you wish.


Check out Lori’s other gift card holder designs in the store and make some of your own. Thanks so much for stopping by.
~Marcia

NEW Christmas Village 25% OFF!

Every year I design some sort of Christmas village. This year, I decided to make a village that is perfect for displaying on a skinny shelf or mantle. Each of the houses are the same width and depth. They have a large opening on the back that is perfect for inserting fairy lights or tea lights. Be sure to watch the YouTube tutorial that I just released today to see how to assemble these cute houses. In the tutorial I demonstrate the Luminary tea lights that flicker and have a timer (and they offer optional remote). I hope you enjoy making them this holiday season. You can purchase the SVG files in the Christmas Village Bundle to cut on your Silhouette, Cricut, Brother Scan N Cut, or other cutting machine. And, the best part is that they’re on sale 25% OFF this week. Check them out….

Thanks for checking out the NEW FILES! Be sure to grab the weekly freebie with a $1.99 purchase and the FREE kit of the month SVG files for November with your $20 purchase.

I hope that you all have a wonderful day! Have fun crafting and getting ready for Thanksgiving. I’ll be making pies all day.

Lori