Silhouette Tutorial: Fabric Transfer with Brigit

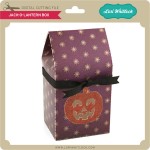
Hi everyone!!  Here’s a fun tutorial on creating a fabric transfer treat bag using SSDE.  It’s such an easy project and comes out great on these cotton muslin bags, so cute for a special Halloween treat.

I used Avery Light Fabric Transfer paper, but whatever you use make sure you read the directions, I believe with their dark fabric you don’t have to do a mirror image.  Other brands may be different also.

I used Lori’s Halloween Embellishments 1 set and the happy halloween from the Halloween Titles.  I ended up adding a witch’s hat to the ghost and a circle for the moon just to fill in the design a little more.

I ungrouped and colored all the pieces, you won’t see the ghost if you use white so add a black line around him, I made it a little thicker under the line style window and then checked print lines of selected shapes.  After you place everything where you want select all and group.

The bag I used is 5″ x 7″ so I resized my design a little larger then 4.5″ x 4.5″, I wanted some space on the bottom and top and some on both sides.

With your design selected click on the Replicate Window and select mirror right, you can move the original off the mat or delete it if you want.  Place the mirrored one in your printable area and print it out.

I cut out around the whole transfer leaving a little border, you could create a shadow layer and do a print n cut but I didn’t want to waste the top margin of my transfer paper.

Use a hot iron without steam, again read the directions of your transfer paper.  I recommend a hard flat surface, not an ironing board. Iron any wrinkles in your bag first so you have a nice area for your transfer

Here it is finished, I slowly moved my iron from side to side and then bottom to top for about 45 seconds.  The colors really came out great.  I tied some Trendy Twine to the end of the bag’s string and pulled it through till it came out the other end so I would have some nice Halloween twine as my tie instead.

Hope you’ve enjoyed this project, you can visit me at http://www.brigitsscraps.com, thanks for stopping by!!

$1 Wednesday at Jessica Sprague

One Dollar Wednesday at JessicaSprague.com!

It’s Wednesday again and that means TODAY ONLY you can snag two digital kits for an amazing deal… TODAY for JUST $1 you can grab this awesome set: Fall Fling Collection. This kit is regularly priced at $5.99 and TODAY ONLY it’s just $1!

FALL FLING COLLECTION

And, you can get the following awesome product for HALF OFF, Flourish Brushes.

FLOURISH BRUSHES

While you are at jessicasprague.com getting your kits, be sure to check out the samples made with each of these kits at the bottom of each listing.

New in Shop + Tuesday Freebie

TODAY ONLY, the FRANKENSTEIN SVG file is FREE with purchase.

This is one of my favorite Halloween shapes. With your $3.00 purchase this $0.99 file will be free. Just email info@loriwhitlock.com after completing your purchase and it will be emailed to you. This freebie is good until midnight tonight!

Don’t forget the sale going this week. Instead of just the new shapes, ALL shapes are currently 30% off until Sunday. We have many requests for the PDF file for hand cutting, class room projects etc, so many of new shapes will also include a line art PDF as well. Check the description on each shape before making your purchase, if you desire the PDF on an older shape that does not include a PDF let us know.

Here are some of Lori’s and Kolette’s newest shapes added to the SVG shop and their Silhouette Portfolios. Thanks for stopping by… Lisa

Only a purchase in Lori’s SVG shop will qualify for the free cutting file.

THANK YOU to all of our talented friends that applied to be a member of our digital team. We will have a decision soon. Thanks for your patience.

New at Jessica Sprague + Giveaway + DIGITAL Creative Team Members needed

New at JessicaSprague this week are these embellishment sets, Basics Paper Flowers and Basics Attachments. These are a great addition to other Basics kits.

You can pick it up this weekend for 25% OFF. What a deal!  This price is good through SUNDAY; Check out your different choices.

BASICS ATTACHMENTS


BASICS PAPER FLOWERS

Check out the beautiful layouts by our creative team.


Layouts by Chrissy Guido

If you would like to join our Digital Creative Team, send your favorite projects using Lori’s files to info@loriwhitlock.com no later than October 7, 2013.

Would you like to win $150 in DCWV Stacks?  Enter in the Rafflecopter below.


a Rafflecopter giveaway

And finally, don’t forget about the amazing deal on the glass etching set at Silhouette. Today is your last day to get these prices. Use coupon code LORI at silhouetteamerica.com/glass

Silhouette Tutorial by Traci

Hi everyone!  I’m excited to be sharing a neat tutorial with you today.  Have you ever thought about using photos in your Silhouette software?  I had never given this much thought until recently when I wanted a banner to match my pictures.  I will walk you through this technique today, and give you three different shape ideas for using photos with your Silhouette or Cameo machine.
First, choose a photo and a shape that you want to use.  For my layout, I knew I wanted a banner at the top of the page that matched my pictures. I work on a MAC, so I can just drag my photo into the software, but another option is to click on “File” at the top, hit “Open” and then choose a picture from your computer.
Once you have both your photo and shape(s) open, drag the shapes off to the side, ungroup and resize as necessary.
(For my banner, I didn’t want the little holes at the top of each piece so when I ungrouped them, I deleted the holes).
Enlarge your photo if needed to accommodate the size shape you want to cut out.
In order for you to see everything better, I made my shape lines black and thicker…but you don’t have to do this.
Move your shape(s) over on to your photo and place everything where you want to cut it out.
For mine, I wanted the varying leaf colors on each of my banners, as shown below.
I zoomed back out on this screen shot, but once all of your shapes are in place, go to the “Modify” window (little icon in upper right corner with the M).
With all pieces highlighted (photo and shape), click on “Crop” — this removes all areas which are not shared by at least two shapes.
Once you click “Crop”, you are left with the shape filled with your photo.
Here is another example that I used for this project.  I cut this cute picture of my son into a tag by following the same directions as above.
Once you have your shaped photos, you will want to highlight everything and open the cut style window (little scissor icon).
Be sure that the cut lines around your shapes are red by clicking on “cut” on the “Cut Style” menu.
Now you will treat this just like a Print and Cut.  (See an earlier tutorial on Lori’s website for Print and Cut directions).
Here is the layout.  As you can see, I also created offsets for the banners and tag to help them pop off the page a bit.
The offset feature can also be found in another tutorial on Lori’s site.
I hope you enjoyed this tutorial.
Here is another example using a photo to create a matching title 🙂
Have fun with this technique!  I’d love to hear how you will use photos in your Silhouette software so
please visit my blog at www.artsyalbums.com and share your ideas with me!
Traci
Lori’s Cutting files used in this project: